March 31, 2012

Silhouettes {My current obsession}

I am obsessed with Silhouettes right now.  I think it has something to do with its simplicity.

Here are some Silhouette's I have found on Pinterest and Etsy.  The first is a tutorial on how to make Silhouette Necklaces!

 
Silhouette Necklace - Tutorial by Nesting Place


Vintage Silhouette Tee in Light Pink as seen on The TomKat Studio
Silhouette Shirt by Oh Fiddlesticks!

Custom Illustration, Silhouette, Girl, Cat, Bird, Rabbit, Please read text below, This is just a sample of my work.
Custom Illustration by Very Prittie


Little Miss Curtsey in Pink - Gift Tags
Love these Gift tags by Maria Soliel

 Personalized Tree Silhouette Art- Wedding, Valentine's Day, Anniversary- custom text background 2 personalized hearts
Tree silhouette by Firefly 1505


 Kitchen Art Print - Silhouette - 8x10

Kitchen art by Delivered by Danielle

Silhouette Ring - Dancing Sisters

Sweet Sisters ring by Karomboola

Custom Silhouette Wedding Cake Topper in Acrylic made from your photos by Simply Silhouettes
Cake Topper by Silhouette Weddings


Custom Digital Portrait Silhouette - Free Shipping
Custom digital portrait by Petit Design Co.

Do you have any favorites?

March 30, 2012

Foodie Friday - Tool Box

FOODIE FRIDAY!

My Tool Box


by Resident Chef James Wood
Happy Friday everyone!
Have you ever gone to a kitchen style store in the mall and been overwhelmed with the (am I going to really use these) gadgets? I have broken down the most common and useful tools that most professional chefs use on a normal everyday basis besides their brains!
Here is what you will definitely find in my tool box/bag and kitchen to make my tasks easier and more efficient.


You might say, "that looks like a lot of stuff, James!" But I say, "you probably already have a lot of stuff in your drawers, just not the right stuff."

Knives and a steel


Sharp knives make your tasks easier and less hazardous than dull knives.
1. A chefs knife that has a good weight and feel to YOU.
2. A serrated knife or "bread knife"
3. Small utility knife
4. A paring knife pictured is a 3" paring knife and a "birds beak" or "tornee" style paring knife
5. A steel to keep the edges on your knives true and honed
Bench Scraper and Japanese Mandolin.

If you ever wonder how they get those paper thin slices and perfect matchsticks look no further than the Japanese mandolin. This is one, if not my favorite tool (besides my wife) for ease of use and razor sharp blade and its $20 price tag. Be careful though, I have lost a few pieces of skin on this device.
The bench scraper can be used for cleaning up your cutting board, scooping prepped items into bowls/pans etc… to even smashing garlic cloves and chopping them up with the (not so sharp) blade portion.

Measuring and Stirring Devices


Thermometers and timers will always be important if you are ever unsure of internal temperatures or how much longer should that roast take.
A flexible whisk with a good amount of wires is important because most things being whisked require air be incorporated, so the faster you can move the surface area, the faster your job will be complete.
Wooden spoons and rubber spatulas are always handy because they do not scratch stick resistant pans and are fairly easy to clean up
Measuring cups and spoons, I think these speak for themselves

Meat Tenderizers and a Microplane

If you ever want to tenderize a thick cut of beef, a pork chop or a piece of chicken in about a hour the deni tenderizer can do this with ease. It has 30 spikes in a spring loaded mechanism that you just smack your protein of choice with before marinating. $20
The mallet style tenderizer is good for making thin cutlets by placing your meat product between 2 pieces of plastic wrap and beating it unto your hearts content! (if you've had a bad day, look into this therapeutic form of relief.)
Finally the microplane, I have had this tool since it was introduced to the market in the late 90's. It is great for grating the hardest cheese, zesting citrus and even shaving chocolate. The ultimate finishing tool. I think we have all been to that italian restaurant with the great bread sticks and salad that use a different form of this tool to put park on your pasta at the table before you dive into that first bite.

So that is the tools I use most often. I hope this can help you out in making cooking easier at home. Thanks for reading and I will see you next week. 
I would love to hear comments on your favorite tool!

March 26, 2012

Repurposed Inspiration

Sweet Inspiration

Everything I see these days is repurposing old things into new.  I love it, I am obsessed.  I now can't help myself, wherever I go I try to see how else I could use it.

I took my girls to the Children's Museum today and they had so many wonderful ideas of incorporating every day objects into art.  I am so inspired, and I am kicking myself that I didn't bring my camera!

My favorite art pieces were animals out of spoons, knives, forks.  There was a crab whose back was made completely from just the spoon scooped part.  The handle made up its legs.

Here is a photo I was able to find with a cool ceiling art piece out of old silverware.  Beautiful!

Utensil Design on the Ceiling of the Pretend Restaurant ~ Phoenix Children's Museum

Here are some of my favorites on either Pinterest or Etsy on featuring repurposed items.

Painted Vases - Hot Colors - Set of 3 - Spring - Summer
Repurposed Fun Vases by RetroPops


DIY Cake Stands by Decor-ganize Crafts


Pinned Image
Hooks from Rolling Pins from Recyclart


Amazing DIY painted and embellished mason jars by Pure and Noble


Black Block Key Rack
Key Holder by Blue Bird Heaven

BLUE BIRD HEAVEN IS OFFERING 10% OFF TO HER ETSY SHOP (CLICK ON LINK ABOVE)!  Use code at Checkout!  BLOGTHANKS10
Do you have an "art piece" made from Repurposed Items?  Please share!  I would love to see your masterpiece.

March 23, 2012

Foodie Friday - Mac and Cheese

FOODIE FRIDAY!

Mac and Cheese

by Resident Chef James Wood

Happy Friday Everyone,

This week I will be making my version of mac and cheese. If you are on a diet, you might want to pass this one up…. even using it as a side dish might be deadly!
Anyways lets get to it, this is a pretty simple recipe and is really not that hard to make.

First off, here is your list of ingredients…
1 pound of Rigatoni
1 pound of Bacon (diced, cooked and reserve the fat)
2 cups of Whole Milk
4 ounces butter
8 ounces Sour Cream
4 ounces Cream Cheese
1/2 cup shredded Mozzarella
1/2 cup of Mexican Cheese Blend
1 Yellow Onion (diced)
5 clove Garlic (chopped)
1 bunch Parsley (chopped)
Juice of one Lemon
1/4 cup AP flour
1 cup of panko bread crumbs

Pre heat oven to 350 degrees

1)Cook off Pasta, Strain and Return to pot

2) Cut bacon into strips (I just take the whole pound, lay it down and cut it)


3)Place bacon into a medium sauce pot with 1/4 cup of water
and turn on medium low heat, stirring occasionally to render the bacon


4) While your bacon is cooking, prepare the rest of your ingredients…. Onions, Garlic, Parsley, etc…

5) When your bacon is done cooking scoop out and place on a paper plate to absorb excess fat.

6)Melt Butter in the bacon fat


7)Add onions and the garlic and cook until translucent


8) Add flour and stir constantly for 4-5 minutes making sure not to let flour burn to bottom of the pot


9)Add milk, cream cheese and sour cream and stir in until smooth
10) Using a stick blender if you have one, blend until smooth or transfer to blender and blend until smooth.


11) Add the rest of your cheeses, 1/2 the parsley, bacon and the smooth sauce to the pot and then stir until incorporated.


12) Put mixture into greased ramekins and top with panko and parsley then spray top with pan spray


13) Last, Bake in the oven for 20 minutes and serve

I served mine with a grilled pork chop and a salad. Enjoy and have a great weekend.

March 21, 2012

Welcome Spring - Uses for Thrift Stores or vintage items.

Welcome Spring!

With the first day of Spring here, I always get in the mood for planting new things.  Instead of running out and buying new pots and containers, look around your home or hit your favorite thrift store and repurpose.  This is great for being green, decluttering your home {Spring cleaning}, and adding character to your yard and home!

Here are some fun ideas I found.


Colander, you can paint to match your decor from Inspire Bohemia


Photos in Mason jars by  Style Me Pretty


Tea Cup and Pitcher from DIY Network


Old bottles from Belissima Vita Weddings


Rubber rain boots from Inspire Bohemia


School desk planter after
Old school desk (turned upside down) as a planter holder by Better Homes and Gardens


2011_4_15_Repurposed_Planters.jpg
Repurposed tea containers by The Micro Gardener


Shell planter by Poetic Home.  Great for remembering your summer vacation.


Succulent toolbox planter - an easy project when planted with drought tolerant succulents.
Toolbox as a planter The Micro Gardener.  The Micro Gardener has an article called Clever Plant Ideas, where you can find other great ideas.  You can find it here http://themicrogardener.com/clever-plant-container-ideas/


What do you have in your garden or home that is repurposed?  What do you enjoy growing?  I would love to hear!

March 19, 2012

Organization Wall Part 1

Clutter- Boo!  Organization - Yes!

I hate the clutter in my house (and it put's my husband, the clean freak, on edge.)  The kitchen counter is a huge landing zone.  Now that my oldest daughter started Kindergarten there are multiple papers that come home, that need to be saved, sorted, filled out, etc.  My youngest daughter goes to daycare and brings home darling artwork I can't part with.


Enter the wall from the garage to the kitchen. Our daily path with loads of junk looking for a home. I used to have a mirror on this wall but we repainted, and I never hung anything back on it.


Company does not see this wall, the front door is the opening beyond the clock in the kitchen.


I am going to take charge of this wall and put it to use!  And once and for all clear the clutter from the kitchen counter.

Here is a sneak peek of one of the items that is going on this wall: 


Eames Hang-it-All Coat Rack

I won this fabulous original Eames hang-it-all, and it has been sitting in my daughter's closet for 4 years. 

 Stay tuned for the finished wall!

What do you have in your home that helps you stay organized?

March 17, 2012

Happy St. Patrick's Day!

Happy St. Patrick's Day!


My favorite thing about St. Patrick's Day are shamrocks.  It started when a friend from highschool's mother gave me a plant.  I had it for several years until I moved into my current home almost 10 years ago. 


For some reason, I could never find the right lighting.  So, every year I would buy a shamrock plant in hopes one would take off.  Every year I would hold out while only three leaves were left.  And finally giving in to my husband's request to just throw it away, I would.  It finally got so bad each year that he would question why I even bought the plant.


But, there is something about them.  I love how the leaves close at night and open in the day.  Finally, two years ago my friend's mother from college gave me another Oxalis (Shamrock) plant.  It had been growing outside, and she suggested I split it apart and plant one in a pot and one in the ground both outside.  It worked!

Each day I walk by the front door, I always smile.  It makes me so happy.  Here is mine.


There are hundreds of different varities.  According to Martha Stewart they are easy to grow.  But, in this desert climate it has been a little challenging.  I planted mine on my front porch facing north.  It is in mainly shade and that seems to be the trick for my house.

What do you enjoy growing?

Hope you find the gold at the end
of your rainbow!


March 16, 2012

Foodie Friday - Basil Pesto Chicken Sandwich


FOODIE FRIDAY!

Basil Pesto Chicken
& Mozarella Sandwich

by Resident Chef James Wood


Happy Friday everyone! Today I am sharing my version of Basil Pesto and then I will incorporate it into a tasty chicken sandwich.
First, let us start off with the pesto… Here is a list of what you need…
4 ounces of Basil (usually sold in a 4 ounce box at the market)
4 ounces of spinach
4 ounces of pecorino romano
2 ounces parmesano reggiano
5 garlic cloves
1/2 teaspoon of chili flakes
1+1/4 cups extra virgin olive oil
1 large lemon
2 teaspoons salt
1 teaspoon pepper
and a food processor
This costs about $8-9 to make in my neck of the woods up here in Seattle, but, it yields about 24 ounces of fresh pesto! At about $0.38/ounce thats pretty awesome. Plus, this is a ingredient that has tons of uses AND freezes extremely well!

Step 1
Place the chunks of parmesan and pecorino in your food processor with bottom blade attachment and turn on. Let run until very small pebbles have been created.
Step 2
Add the garlic and pulse until incorporated
Step 3
Add the basil, stems and all!!! Pulse until broken down and then add the spinach and repeat. (***I use spinach because it has a neutral flavor compared to the basil and you can double the size of your recipe without putting a damper on your grocery bill! But if you're feeling sassy…. Just double the basil!)
Step 4
Add the juice of the lemon, pepper flakes, salt and pepper and turn the processor to the on position and let run.
Step 5
Slowly drizzle the olive oil into the processor until you have a smooth consistency and let run for about 15-20 additional seconds.
That is it! Simple, easy and packed with flavor! Transfer to a storage container.
***A trick we use in the the restaurants is to take a small piece of plastic film and place it over the surface of the pesto before you put on a lid so it can keep the beautiful vibrant green color without the risk of oxidation. Lasts for a week in the fridge and up to a month in the freezer.

Now for the Pesto Chicken Sandwich with fresh Mozzarella and Roma Tomatoes

What you need to serve 4…
4 ciabatta or torta rolls
2 chicken breasts
2 ounces mayonnaise
2 ounces of FRESH PESTO
2 Roma Tomatoes
8 slices of fresh mozzarella (*** you can purchase this in 2-1 pound logs at Cosco for $7.99 instead of paying $5.99 for a 5 ounce ball at the grocery store.)
Olive Oil
Red Wine Vinegar
Salt and Pepper

Pre-Heat your oven to 350
1. Mix the mayo and pesto together
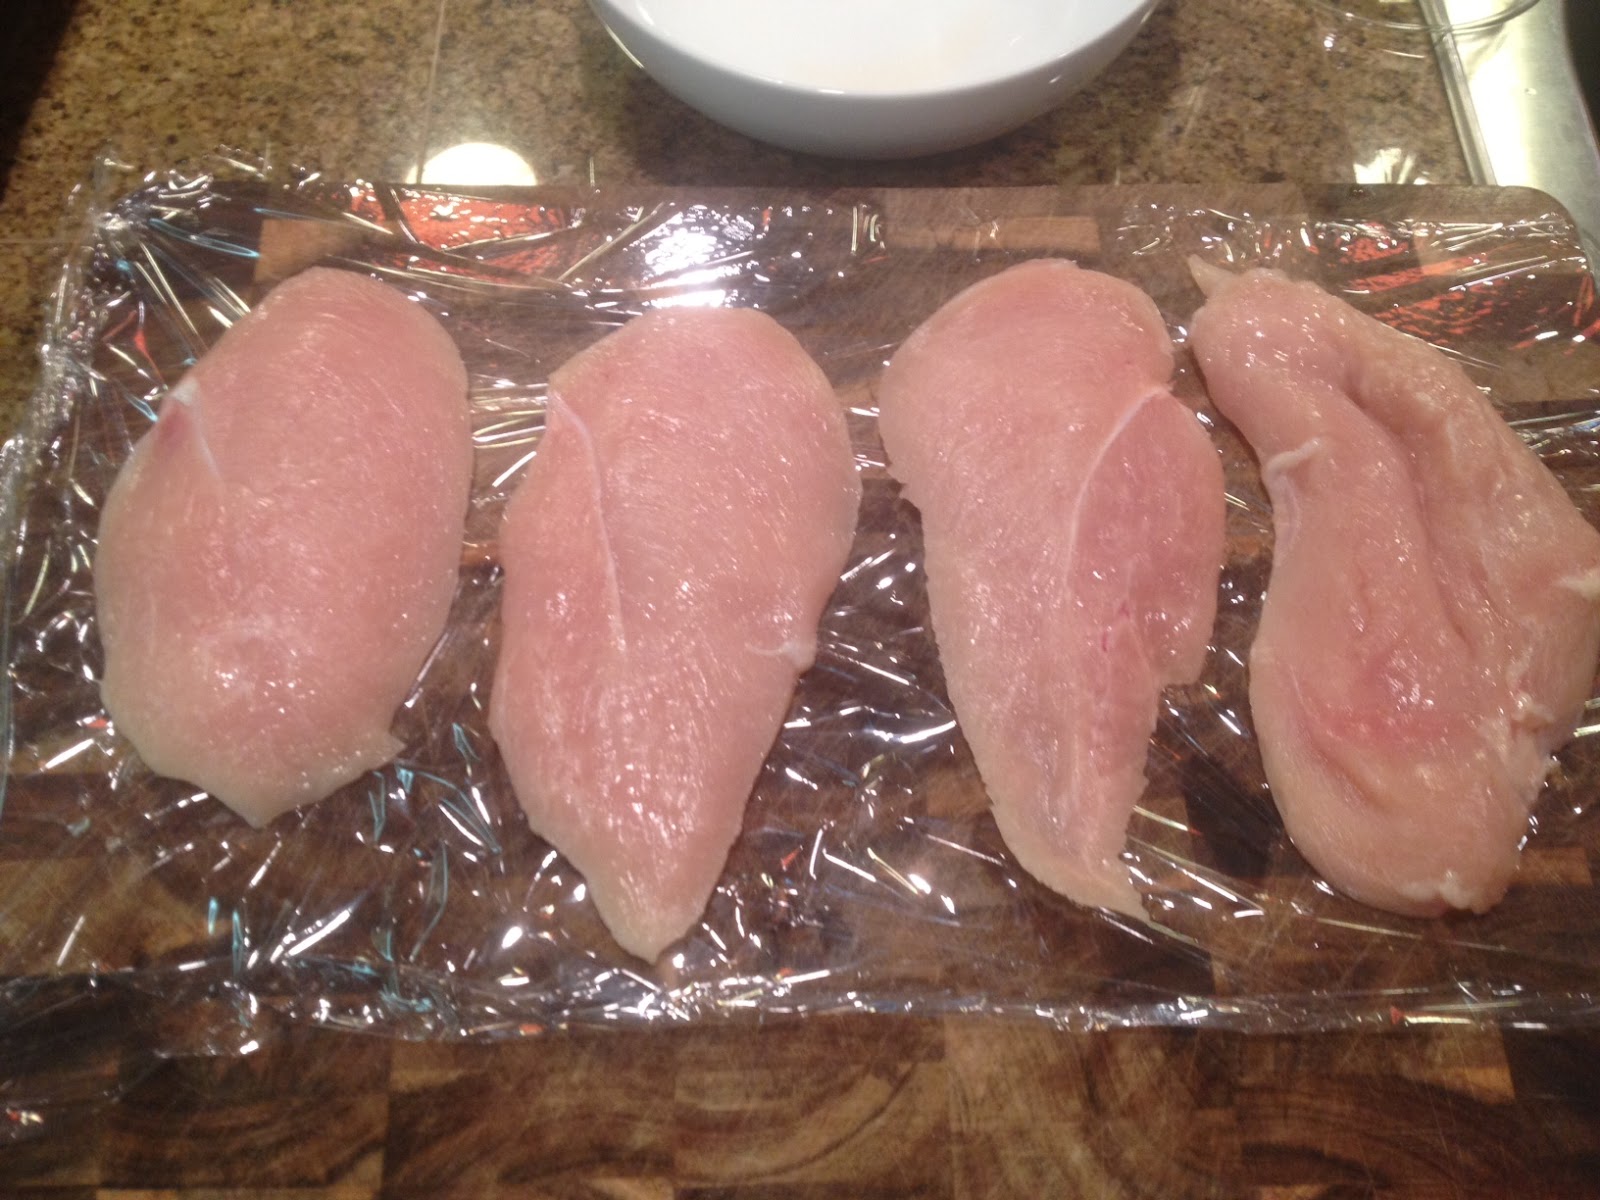
2. Slice 2 chicken breasts in half and place on plastic film as pictured, put another piece of plastic on the top and pound with a tenderizer until they are even. Place in a vessel and drizzle with oil, vinegar, salt and pepper.
 
3. Heat up a skillet, slice your rolls in half and drizzle with olive oil then toast in the skillet and set aside.
4. In the same skillet (because it is already hot) start to sear your chicken breasts, flip over, place the cheese on top and then toss it in the oven for about 4-5 minutes.


5. While chicken is finishing in the oven, dress your bread with the pesto mayonnaise.


6. Once chicken is thoroughly cooked thru, finish assembling your sandwich and serve.
I accompanied mine with a simple salad with oil and vinegar.

Enjoy!!!

Have a great weekend and a great St. Patty's Day.

James

James with wife Lisa