April 29, 2012

Woven in Love - A special project with my Grandmother

{{{Woven in Love}}}

For as long as I can remember, my grandmother has owned a weaving loom.  I remember several items she made while I was growing up, including some beautiful pillows she made for my wedding day.  But, I never saw her actually use it.  It sat in her sewing room, and has moved to two other houses after my grandfather passed away.  It was a piece of furniture that I always knew was there, but never thought much more about it.

My grandfather insisted on the Cherry instead of the oak. (Good job Grandpa!) 

It was after her three children moved out of the house that she decided she wanted to start weaving, and heard about a sale at a local store. My grandfather, said you better go get it before the sale is over.   (She said like it would never be on sale, again.)  It was very pricey and she laid awake the night they bought it.   She thought, what if I can't work this thing? She had never weaved before.  She took a couple of courses, and taught herself the many techniques she still uses to make a variety of amazing pieces over many years.

(My Grandmother and her amazing craft room.  Look at all of that yarn!  She has three other cabinets just like it.)


(My Grandmother's 1st weaving project.  This was done with VERY fine yarn!)


(One of my Grandmother's famous woven handbags.  I love the colors and texture!)


(Lovely scarf and Detail)        

                                                   
(Silky scarf) 

(Hand woven Cotton by my grandmother)

She is very humble.  Although she belongs to a weaving guild, she says she never could be as good as many of the other weavers in the guild.  I think what she makes is amazing. 

Recently, I asked if she would show me how to use her loom. We both were excited. She set up the loom for me (this is the hardest part!) with beautiful fall color yarns in browns, cream, henna and deep red. 


With her bare feet, she showed me what the different pedals did, how to use the shuttles and what the different terms meant such as shed, beat, tabby and so much more.

I love it.  I love how free it is.  I love being able to change a design on the fly.

As I have gotten older and my other grandparents have passed away, I feel just how important it is to spend time with my last surviving grandparent.  What a great way to spend time with her and learn a little more about her amazing talent and this piece of "furniture" that  has been just as much of my life as my grandmother.


I am so pleased of my table runner that
I made with my grandma. 


It is something that I can always look at
and remember my grandmother
and the days it was {{{Woven in Love}}}


Linking up:


lollipops

April 27, 2012

Foodie Friday - Baked Meatballs in Tomato Sauce


Meatballs and Tomato Sauce
(super fast and easy!)

by Resident Chef James Wood 
Happy Friday everybody!
This week I have designed a recipe of meatballs in tomato sauce for 15 minutes of prep, shove it in the oven and forget about kinda dish that should please all your friends and family. You don't even need a knife!!!

Baked Meatballs in Tomato Sauce

Prep time 15 minutes
Cook time 45 minutes
Meatball recipe:
1.5 lbs ground pork
1.5 lbs ground beef
1 cup panko breadcrumbs
1/2 cup grated parmesan cheese
1 tablespoon granulated garlic
1 tablespoon onion flakes
2 tablespoon Italian seasoning
1 teaspoon sage powder
1 teaspoon chili flakes
3 eggs
Salt & Pepper to taste

1. Put all ingredients into large mixing bowl and fold together until incorporated.


2. Form a ball with your hands to size of your liking and place into a greased 9x14 baking dish.


Tomato Sauce recipe:

1-28 oz can whole peeled tomatoes
3 oz tomato paste
1/4 cup red wine vinegar
1 tablespoon Italian seasoning
1 teaspoon granulated garlic
1 teaspoon onion flakes
Salt & Pepper to taste

1. Put all ingredients in blender and mix until smooth.


2. Pour over the meatballs


3. Cover dish with foil and bake at 350F until meatballs are cooked thoroughly about 35-45 minutes .

 
With meatballs, the possibilities are endless... From classic spaghetti and meatballs to a meatball sub with fresh mozzarella and that pesto we made a few weeks ago. I put
mine over some pasta!


Well have a great weekend and please, try these recipes and feel free to ask questions.

James


Finding Joy in the little Things - Peas

Finding joy in the little things


With the season changing, it is time to take out some of my winter garden plants, and make room for the warmer weather.  My pea plants have brought me joy the last two years in my garden.  Each week I would be so excited to see how tall they grew.   They seem to grow every day.  I love to be outside and snack on a few pods!

I finally ripped them out the dead peas today and there were a few patches of green with flowers left.  I kept them and put them in a vase on my kitchen table.

(A sneak peek of my 1st weaving project with my Grandma!)
I love how the tendrils reach around they are so sweet.  Even my husband said it looked cute.  (I guess he has been hanging around our two daughters lately!)


Until next year!  What brings you joy!  I would love to hear.

Happy Spring to you!

April 22, 2012

Sweet Inspiration - Earth Day + Repurposed Home Decor

EARTH DAY

Love this Chevron Recycled Wood Planter box by 91204!

Never doubt that a small group of thoughtfully committed citizens can change the world.  Indeed, it's the only thing that ever has. -- Margaret Mead

Pinned Image
Chevron Planters with Recycled Wood by 91204

If you have been following lately, you have noticed I have had several posts on repurposing.  This is such a hot and fun trend right now and perfect for EARTH DAY! 

By repurposing we help save unwanted items from going to the landfill, and we get save some green ($$) while we are at it!

Here are some beautiful projects I have been inspired by!  I hope they will bring inspiration to you.


 Library card file turned into console table with pin legs and mirror top | styled by Emily Henderson          


Stunning Repurposed Backdrop by Time Worn Interiors


Old Doors as a Headboard in this Shabby Chic room by Anne Wisniewski


Reused window for Picture Display by Funky Junk Interiors

and Finally...get the Kids Inspired!


I love this cute Free Printable Tree Planting Kit by Chickabug


Do you have a favorite?   Have you created something from something old or repurposed something?  I would love for you to share with us!

Kari


April 20, 2012

Foodie Friday - Grilled Shrimp Caesar Salad with homemade dressing- PART2


Shrimp Caesar Salad with homemade dressing


by Resident Chef James Wood
Caesar dressing
2 cups Blended oil
1/4 cup red wine vinegar
Juice of one lemon
One egg yolk
1 teaspoon worse to shire sauce
1 tablespoon Dijon
Two cloves of fresh garlic
Two anchovy fillets
1/8 teaspoon red pepper flakes
1/4 cup grated Parmesan Reggiano
Tabasco to taste
Salt-and-pepper to taste


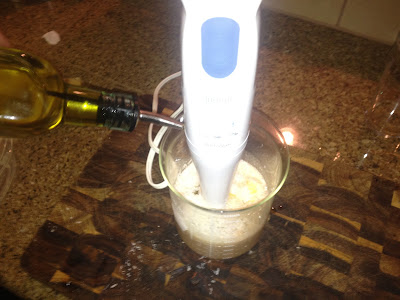
Add all ingredients except oil into food processing type device. I am using a beaker and a stick blender.


Once again, slowly drizzle blend oil while device is running and if it gets too thick for your liking, add a little water.


Woohoo some tasty caesar dressing. (Did you know that caesar dressing was invented in Tijuana?? You should google it to get the whole scoop!!)


Now for the delicious Grilled Shrimp Caesar Salad


First I started by taking the italian dressing we made earlier (in Part 1) and marinated, skewered, peeled and deveined the shrimp.


Then I cut a baguette on a bias and brushed it with blend oil (from Part 1), seasoned with salt and pepper and baked at 350F for 5 minutes until toasty!


I threw the shrimp on the barbi, my bbq was about 600F so i just put them on and immediately turned off the barbi.  It took about 2 minutes on each side to complete the cooking process.


I let them rest on a plate while I tossed the salad.
I cut up some romaine lettuce into 2x2 squares and seasoned it with salt and pepper.

Drizzled some dressing on it:


Tossed it:


Used my potato peeler to shave some parmesan:


Then I made it look all purdy like this!!!


So that was a little lesson on what you can do with oil and vinegar. I hope everyone has a super weekend. Take care and brush your hair!

James Wood

Be sure to check out Part 1 for homemade salad dressings - Italian as menitioned above and Balsamic Vinagrette.  James also describes what blend oil (a great way to stretch your budget!)

Foodie Friday -Homemade Italian and Balsamic Vinagrette Dressings - PART 1


Homemade Italian and Balsamic Vinagrette Salad Dressings


by Resident Chef James Wood

Happy Friday everyone and I hope you all are getting some sun that is much needed up here in the Northwest. It is still 50, grey and raining :-/.  Let's get cooking!
Today I will be sharing a few salad dressings that I have invented.  Next post I will incorporate a few of them into a Grilled Shrimp Caesar Salad.

Some of you may already know, oil and vinegar are two very essentials ingredient when it comes to cooking; kind of like a yin and yang. Balancing these two things is crucial to most cuisines and learning this "balance" is one of the first things a cullinarian would learn when working in a kitchen. 


I would first like to teach you a money saving trick when it comes to extra virgin olive oil by turning it into a "blend oil" . By mixing extra virgin olive oil with say canola, corn or vegetable oil you can stretch out an expensive bottle of the good stuff with some of the basic stuff. You can always buy it in the pre-marked blend oil bottles but you never know the quality of the cut. Not only does this stretch out the value, it also makes it easier to cook with at high temperatures. We call this term a "smoke point". Since olive oil is a much denser oil than your common clear bottle that you get at the grocery store it tends to "smoke" much faster than its clear bottle counter part when put under the stresses of high heat, sometimes even catching on fire. One way I was taught to prevent this was to create a blend oil. Here is the recipe…

Blend Oil

2 cups canola, corn or vegetable oil
1/2 cup extra virgin olive oil

This mixture allows the fruity, herbaceous flavors of the extra virgin press to penetrate the other oil while saving you money and quite possibly a kitchen fire. (When buying olive oil or extra virgin olive oil be a snob and hold it up to the light, the harder it is to see through the bottle, the more pure the initial press.   Also… olive oil expires so keep it in a place where there is little to no change in temperature but not in the refrigerator. Probably around 60-75F is best and try to use it within 2-3 months of purchase.)

So let us get to some salad dressings…

Italian dressing

1 vessel for storage
1 1/2 cups Blend oil + 1/4 cup
1/4 cup of white wine vinegar
Half teaspoon garlic powder
1/4 teaspoon red pepper flake
1 teaspoon chopped dried onions
2 teaspoons dried Italian seasoning
Salt and pepper to taste

Step by Step
Place 1/4 cup blend oil and the dried spices into a sautés pan and place on low heat until you smell the garlic, stirring occasionally to incorporate ingredients.


Once you smell the garlic turn off the heat and add 1 tablespoon Dijon mustard whisk to incorporate and let cool to room temperature and add 1/4 cup of cheap Parmesan cheese. (Just the one with the Green Lid will do) and 1/4 cup of white wine vinegar to the sauté can and whisk to incorporate.


Using a funnel pour into storage vessel then add the 1 1/2 cups of blend oil.


Screw lid on and shake, shake, shake.  And there you have it! Italian dressing. This will last in the refrigerator for two to three weeks.


Balsamic vinaigrette
4 cups Blend oil
1 cup balsamic vinegar
2 tablespoons Dijon
1 teaspoon garlic
Salt and pepper to taste
One vessel for storage

Start by adding all ingredients except oil into blender or a vessel that can be used with a stick blender (I love my beakers.)


Slowly drizzle oil while device is running until you have the consistency of chocolate syrup. If it gets too thick it is totally ok to drizzle water, orange juice, apple cider or anything you think might go well with balsamic to thin it out until proper amount of oil has been incorporated.


The proper consistency should hold onto a spoon like this (I really need to descale my dishwasher!!)


Transfer to a storage vessel, label and date. This will last in the fridge for at least 3 weeks.


Do you have a favorite that you like to make?

James Wood


Be sure to check out Part 2 for homemade Caesar dressing and a great way to use this Italian dressing as a marinade for Grilled Shrimp Caesar salad!  See the recipe here!